



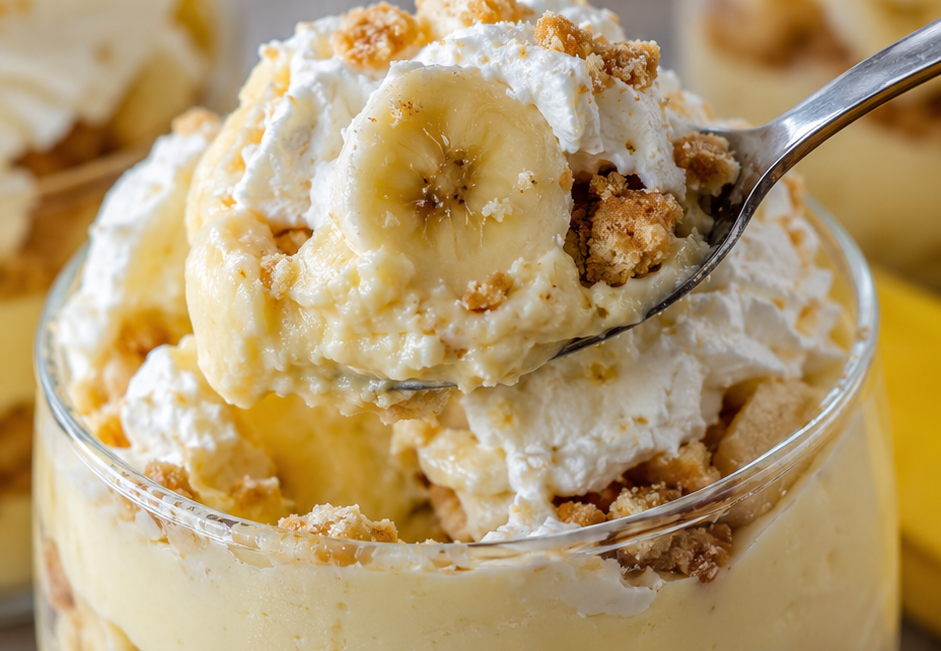
If you’re craving a cool, creamy dessert that tastes like a hug from childhood, these easy no-bake banana pudding cups deliver big flavor with almost no effort. Sweet banana slices, silky vanilla pudding, and crunchy vanilla wafers come together in charming individual servings that look stunning on any table.
Perfect for busy weeknights, potlucks, or when you want something beautiful without turning on the oven. The contrast of textures and fresh banana taste makes every spoonful irresistible.
Quick Recipe Snapshot
- Prep Time: 15 minutes
- Cook Time: 0 minutes
- Total Time: 15 minutes + 1 hour chilling
- Servings: 8 cups
- Difficulty: Easy
- Best For: Quick desserts, parties, family nights, beginners
- Main Flavor Notes: Sweet ripe banana, smooth vanilla, buttery crunch
Why You’ll Love This Easy No-Bake Banana Pudding Cups
- No oven required — Keep your kitchen cool and still serve a show-stopping treat.
- Ready fast — Mix, layer, and chill for a dessert that feels special but takes minimal time.
- Perfect portions — Individual cups prevent messy scooping and make serving a breeze.
- Crowd favorite — Kids and adults alike devour the creamy banana flavor and fun layers.
- Make-ahead magic — Assemble ahead so you can relax when guests arrive.
- Pinterest pretty — Clear cups show off those gorgeous layers for eye-catching photos.
What Is Easy No-Bake Banana Pudding Cups?
This dessert takes the beloved layered banana pudding and puts it into cute single-serve cups. It features instant pudding for speed, fresh banana slices for natural sweetness, and crisp vanilla wafers that add texture without getting soggy too quickly.
The no-bake method keeps everything simple and fresh. You get the same comforting flavors as the classic version but with less work and built-in portion control that looks elegant on a dessert table.
Recipe Inspiration
Banana pudding is a classic American dessert strongly tied to Southern traditions, where layers of vanilla custard, bananas, and wafers create a comforting favorite for gatherings. This no-bake cup version stays true to those roots while using convenient instant pudding for modern ease. It captures the creamy, fruity essence that has made the dish popular for generations without any baking needed.
Ingredients You’ll Need
Pudding Base
- 2 (3.4 oz) packages instant vanilla pudding mix: Creates the smooth, thick foundation quickly.
- 3 cups cold whole milk: Helps the pudding set properly with rich flavor.
- 1 (14 oz) can sweetened condensed milk: Adds extra creaminess and balanced sweetness.
- 1 teaspoon vanilla extract: Enhances the warm, comforting aroma.
Whipped Layer
- 1 (8 oz) container frozen whipped topping, thawed: Gives light, airy texture (or use 2 cups homemade whipped cream).
Assembly
- 4–5 medium ripe bananas, sliced: Deliver fresh banana flavor and natural moisture.
- 1 (11 oz) box vanilla wafers: Provide the signature buttery crunch in every bite.
Optional Garnishes
- Extra banana slices and crushed wafers: For a pretty finish.
- Whipped topping dollops: Add extra creaminess on top.
How to Make Easy No-Bake Banana Pudding Cups
Prepare the Pudding In a large bowl, whisk together the instant vanilla pudding mixes and cold milk for 2 minutes until it thickens. Stir in the sweetened condensed milk and vanilla extract until fully smooth. Fold in the thawed whipped topping gently to keep it light and fluffy.
Slice and Ready the Bananas Peel and slice the bananas into thin rounds, about ¼-inch thick. Work quickly or toss lightly with lemon juice if making ahead to prevent browning.
Assemble the Cups Place a layer of vanilla wafers at the bottom of each 8–10 oz clear cup. Add a spoonful of pudding mixture, then 2–3 banana slices. Repeat with another layer of wafers, pudding, and bananas. Finish with a final layer of pudding.
Chill and Garnish Top each cup with a dollop of whipped topping, a banana slice, and a sprinkle of crushed wafers. Cover and refrigerate for at least 1 hour so the flavors meld and the pudding sets beautifully.
The Simple Cooking Science Behind This Recipe
Chilling the assembled cups is key. The cold temperature firms up the pudding while allowing the banana juices to gently soak into the wafers just enough for flavor without turning them mushy. This balance creates that perfect soft-yet-crunchy contrast everyone loves.
Acid from the bananas also plays a role. Their natural mild acidity cuts through the rich sweetness of the condensed milk and pudding, keeping the overall taste bright and balanced instead of overly heavy.
Expert Tips for Best Results
- Use bananas that are ripe but not overly spotted — they offer sweetness without becoming too soft.
- Chill your mixing bowl and cups briefly for cleaner layers and better texture.
- Break some wafers into halves or quarters to fit the cup shapes nicely.
- Fold the whipped topping gently to preserve air pockets for a lighter mouthfeel.
- Make a test cup first to check sweetness and adjust with a bit more condensed milk if needed.
- Work in an assembly line for even layers across all cups.
- Serve with small spoons for the best eating experience.
Easy Variations
- Chocolate Twist: Add a layer of chocolate pudding or mini chocolate chips between banana slices.
- Peanut Butter Lover: Swirl in 2 tablespoons peanut butter into the pudding for a salty-sweet kick.
- Lighter Version: Use sugar-free pudding mix, low-fat milk, and light whipped topping.
- Berry Banana: Add fresh strawberry slices for color and tart contrast.
- Kid-Friendly Fun: Use colorful sprinkles or mini marshmallows on top.
- Party-Style: Make one large trifle in a clear bowl instead of individual cups for bigger gatherings.
What to Serve With Easy No-Bake Banana Pudding Cups
- Grilled chicken or barbecue for a classic Southern-style meal.
- Fresh fruit salad or mixed berries to lighten the table.
- Iced tea, lemonade, or coffee for a refreshing drink pairing.
- At potlucks or picnics alongside sandwiches and salads.
- Holiday dinners as a cool alternative to heavy baked desserts.
- After school snacks with a glass of cold milk for the kids.
- Brunch spread with coffee cake or muffins.
How to Store and Reheat
These cups keep well covered in the refrigerator for up to 3 days. The bananas may soften slightly after day 2, but the flavor stays delicious.
Freezing is not recommended — the pudding and bananas can separate and become watery upon thawing. For make-ahead, prepare the pudding mixture up to 24 hours in advance and assemble the cups a few hours before serving.
Common Mistakes to Avoid
- Overripe bananas that turn mushy too fast — choose firm-ripe instead.
- Using warm milk, which prevents proper setting — always use cold.
- Skipping the chill time, resulting in loose layers — give it the full hour.
- Overmixing the whipped topping, which deflates the creaminess.
- Packing cups too tightly, which compresses the crunch.
- Not covering during storage, leading to dry tops or fridge odors.
Frequently Asked Questions
Can I use homemade pudding instead of instant? Yes. Cooked pudding works well but needs extra chill time to set fully before layering.
What’s the best substitute for vanilla wafers? Graham crackers, shortbread cookies, or ladyfingers all give great results.
How far ahead can I make these? Assemble up to 24 hours ahead for best texture, though they taste great on day 2 as well.
Can I make this gluten-free? Yes — use gluten-free vanilla wafers or cookies and check your pudding mix.
Why do my bananas turn brown? A quick toss in lemon juice helps. Also, cover the cups tightly.
Is there a way to make it less sweet? Use unsweetened whipped cream and reduce or omit the condensed milk, adding more milk to adjust consistency.
Nutrition Facts
Per serving (1 cup, approximate): 380 calories, 12g fat, 62g carbohydrates, 3g fiber, 45g sugars, 6g protein.
Nutrition information is approximate and may vary based on exact ingredients and brands used.
These easy no-bake banana pudding cups bring joy to any table with minimal fuss. Save this recipe for your next gathering or weeknight treat, and try the chocolate or berry variation next time. Your family will thank you for the creamy, dreamy layers.


